Last night at my knitting group meeting, Sylvia asked me whether I still liked old knitting magazines. I replied that I did, and she asked "How old?" "Any age," I said, "Forties, Fifties..." She said "Sixties?" and I said "Sure!"
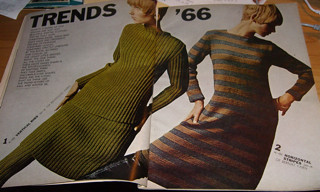
So she gave me a bag with 17 issues of Vogue Knitting, from 1960 - 1969. Words cannot express how fabulous these magazines are. Even in the moment she gave them to me, I told her "Sylvia, these are worth money." But she said, "Oh, no, you take them." I didn't press her farther.
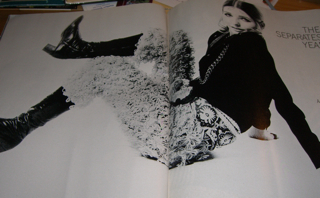
Each issue has around 50 knitting patterns. There are sweaters, coats, dresses and suits. It's easy to mock the hairstyles and the colors, but only in the latest issue, from 1969, is the flower power style starting to creep in, Even then , the daisy flower loom pants
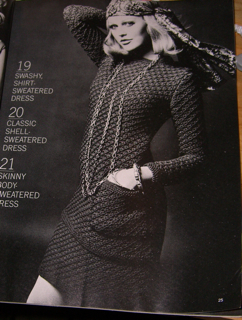
are more than outweighed by the incredibly stylish suits
Some of the sweaters do look dated.
The combination of cowl neckline, raglan sleeves, mohair and textured stitches really says "Sixties" to me, especially if it were in a pastel color.
But this page could run in the next VK, and who would be the wiser?
(Except for the headline, of course.)
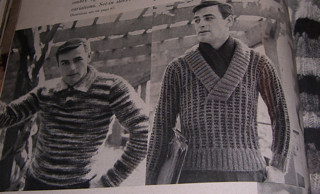
The men's sweaters don't fare as well. The concept of fitted clothes for men has really gone by the wayside, even in high fashion, so these look very dated.
Of course, I don't know anyone who'd wear any man's sweater from Knitter's in the last 10 years, either.
One of my favorite features in VK was "Then and Now," where they took a design from the past and either reworked it or just republished it as is. There are at least 6 designs in my set of magazines that were so treated; it was clearly a fertile era. I miss "Then and Now," but now I have the real thing.
Thank you, Sylvia!
Friday, September 26, 2008
Thursday, September 25, 2008
Besom
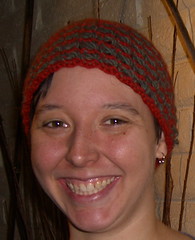
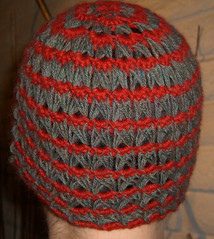
I've written up the pattern for the successful broomstick hat. I gave it to my friend Emily and then coerced her into modeling it.
(She's so cute!)
The pattern is called Besom (which is an old word for a old-fashioned broom) and it's available both as a free Ravelry download, or off to the right. Be sure to look at the tutorial over there, too.
I'm now going to use this technique to make a beret, which I will probably call Balai, because that's how my mind works.
Last night, I think I got down far enough on the first sleeve on my cardigan so that it's time to do the lace detail at the cuff. The elephant seal researchers from UCSC were talking, and, like all research scientists, could not stop talking. Class ended 45 minutes late. But those seals are amazing animals. They spend 90% of their time at sea underwater. Ninety percent!
Sunday, September 21, 2008
Tutorial
Well, if you were really trying to learn how to work broomstick crochet in the round from that last post, I'm sorry. I didn't provide nearly enough information. So I created a tutorial for it. This one is for two-color broomstick circles, worked in the round from the center outward. I'll do the one-color version next. The tutorial is a 1.5 MB PDF, available here, and on the right in the new section in the sidebar.
Friday, September 19, 2008
Shiver me timbers
Today is Talk Like a Pirate Day, which I celebrate somewhat sporadically. Ravelry made a big deal about it, putting a little three-master icon next to the site name, and giving people parrots on their shoulders when they uploaded new ravatars with "pirate" in the name.
The elephant seal is in honor of my docent training at Año Nuevo State Reserve. Said classes involve driving over the Santa Cruz Mountains at least once a week through the end of the year, as well as sitting for 2 1/2 hours, listening to fun nature facts. Did you know that female elephant seals transfer 40% of their body mass to their pups in 28 days of nursing?
It's good time for mindless knitting, in other words, and now that I'm on the sleeves of my Moons and Star project, I'm saving it for class time. Or that's my story, anyway.
Which means that I'm doing other things in the meantime, like when I'm taking the train up to San Mateo for lunch. I checked out a book from the library, with the somewhat offputting title of Exciting Crochet
It is, pretty much, exactly what you'd expect from the cover. However, at the end of the book, after all the badly-photographed 80's-style projects, Ms. Kent put forth her method of working broomstick crochet in the round.
Now, every explanation I've read about broomstick crochet asserts that it can't be worked in the round. I guess if you were really using a broomstick, that would be true. Jennifer Hansen (the Stitch Diva, who is my hero) understands that this is nonsense, and has one of her excellent videos explaining one way to work in the round. Muriel Kent, however, showed a way of starting flat circles with broomstick lace, and I've combined that with the way that I work broomstick in the round with a circular knitting needle.
To recap for those of you not familiar with the technique, broomstick crochet involves drawing up long loops of the working yarn, one per stitch from a row of single crochet, and keeping them on a large knitting needle (or broomstick, if you're old school.) Then you work a return row where you take a group of loops off the needle (3, 4 or 5, most commonly) and work the same number of single crochet as loops in the group. This row becomes the foundation for the next row of loops.
So how do we make a flat circle with this technique? By increasing at the proper rate so that the work curves around to join itself. Muriel Kent says to start by chaining 6, drawing up 3 loops in each chain, and working the loops off in groups of 3 with 6 single crochet in each group.
Well, first note that blithe "draw up 3 loops in each chain." As anyone will realize who has tried to knit twice into the front of the same stitch, poking your hook repeatedly in the same place and drawing up another loop just gives you one really big loop. I did manage to start a circle this way, but it took poking my hook into three different parts of each chain, which I don't recommend.
Be that as it may. By working 6 single crochet in each group of 3 loops, you've set up a foundation row that will double the number of loops on the next round. That's her formula, doubling the number of loops in each round until the piece is the size desired.
I decided to try a broomstick crochet hat, Using worsted weight yarn (CE Lush) a size H crochet hook and a 15mm circular needle, I started my circle and merrily increased every round, ending up with a circle that was as ruffly as a very ruffly thing, indeed.
I had neglected to take into account the size of the knitting needle. My loops were shorter than Muriel's, so my rows were too wide for their height. The circumference of a circle has to increase π times the rate of the diameter. With knitting and regular crochet, the proportions of the stitches stay roughly constant with different thicknesses of yarn (assuming you're not working ultra-tight or way loose) and you can count on making a flat circle by increasing 4 stitches per round in knitting, 6 in single crochet, 16 in double crochet, &c. But broomstick size can vary independent of the size of the stitches, so I need to figure out the proper increase rate for a given combination of yarn, hook and broomstick.
Which I've been trying to do. I managed to make a usable hat
but it's a baby hat.
Increasing one more round at this same rate gave a circle that was too big for my head.
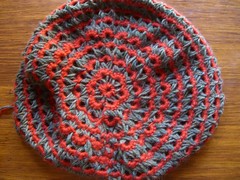
although I could go on and make it a tam. More research is clearly needed.
Thursday, September 4, 2008
Feast or Famine
Finally I have photos of my WIPs, so I feel motivated to post.
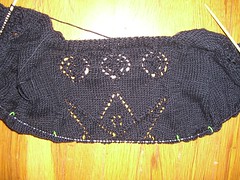
You may recall that I have expressed the opinion that a black cardigan would fill a hole in my wardrobe. I bought a big cone of wool-silk yarn from Elisabetta back on my yarn crawl, and so I've started a top-down, set-in sleeve cardigan.
This is an awfully glary photo, but I wanted the lace to show up. This was hard for me to get started. Originally, I was going to use the Vine Lace pattern from Barbara Walker's first Treasury, because it's a four row repeat, and the two pattern rows are identical, just offset by one stitch from each other. Even though I was copping out with the shaping and increasing in plain stockinette until I had another nine stitches for a new repeat, I just couldn't get the pattern straight. I got about halfway through the yoke, and then ripped it all out.
Then I decided to keep the lace to vertical panels with plain stockinette in between. I really had my heart set on something vine-y and botanical, but I just didn't like the way any of my botanical swatches looked in the black yarn. So I went with something geometric, the Wheel Web pattern from the third Treasury, and the Star medallion from the second. Instead of Moon and Stars, it's Moons and Star.
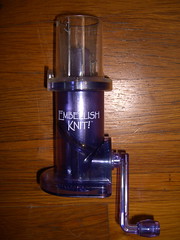
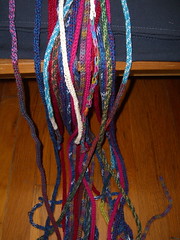
Then, while sitting in my craft room with the door open and getting mad about the drone of flies inside, I decided to make a curtain for the door. In Italy, at least 20 years ago, many shops had curtains made of fat, chenille-like ropes to keep the flies out. I dragged out my Bond EmbellishKnit!
and started cranking the i-cord from my stash of leftover sock yarn.
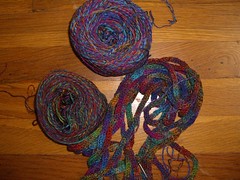
It's miles faster than knitting it by hand, but an almost-full ball of sock yarn still takes about a half hour to turn into i-cord, so I had some time to think. And my next thought was that I'd like to try using the i-cord to make a garment, by coiling it into a spiral and sewing it to itself. I reserved some sock yarn for this purpose; I don't think I have enough for a sweater, but I can probably get a skirt out of it.
I really like the look of this i-cord; it looks like Noro (but so much softer.)
I have several new activities that will involve sitting in classes or meetings. I really need an unobtrusive project to work on. I'm still following the star chart on the cardigan, which doesn't fit the description.
Subscribe to:
Posts (Atom)